Tag: Ash

  • Carter Table

    Carter Table

    carter5
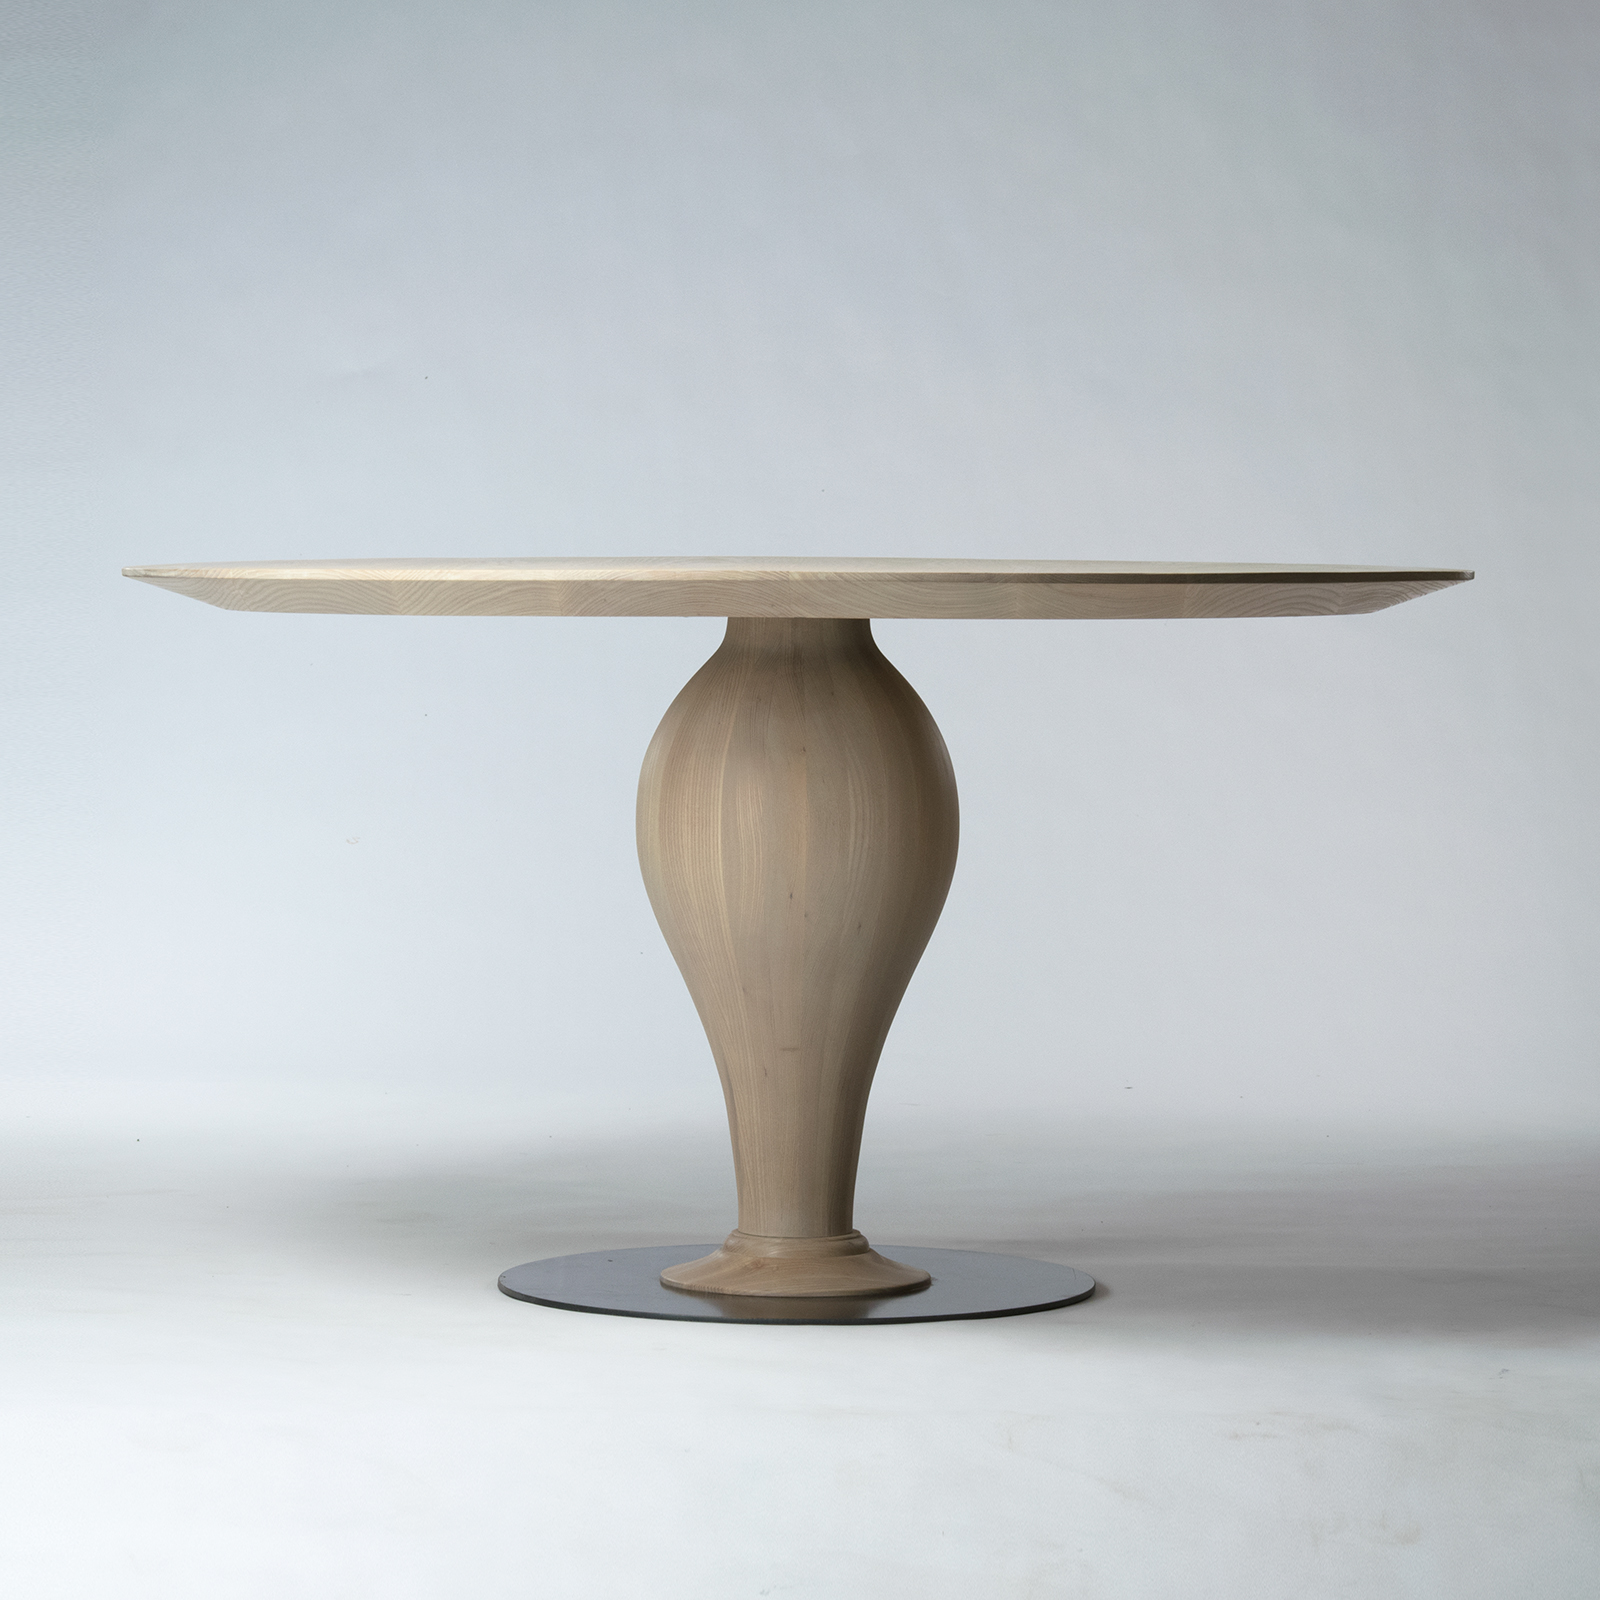
    Tim Cuppett Architects approached me with creating this table for a hill-country retreat they were creating for their client. The design process came about as a collaboration with them.

    They needed a kitchen table for everyday use that’s separate from the big dining room table. This would be the table they would use the most often for daily use- casual eating, conversations, homework, coffee drinking, etc. In other words, it had to be made to withstand the daily toil, but still be elegant. Space was limited, so the round table was a natural choice.

    [singlepic id=301 w= h= float=center]

    The design was driven from the chair backs of the client’s family heirloom dining chairs. The chair had a queen anne style back, so we took that form and transformed it into the pedestal base. Because we didn’t want to see wood lamination joint lines as we cut the extreme curves, we glued up the base in a coopering technique. The ash wood was selected to get the straightest grain possible to keep the lines flowing smoothly.

    [singlepic id=299 w= h= float=center]

    The top is actually a thick top, but we cut a large bevel around the perimeter to create a knife edge to keep the top visually light. It also allows for more view of the pedestal base. There is a metal framework inlayed into the underside of the top to keep everything flat and allows for a strong connection to the base.

    [singlepic id=300 w= h= float=center]

    For a narrow pedestal base like this, the footing is always an issue. Most traditional pedestal bases have a large wooden structure (usually in a claw foot detail) that would have destroyed the whole look, so we went for a much cleaner and more modern look by adding a steel plate as the feet. Creating a thin profile for the bottom really highlights the shape of the pedestal without sacrificing structural integrity or making a tipsy table.

    [singlepic id=302 w= h= float=center]

    The table was finished in white oil that kept the wood looking as natural as possible.

  • Lounge Chairs

    Lounge Chairs

    lounge2

    I’ve always wanted to design and make my own chairs, but have never had the opportunity to do so, so I used the East Austin Studio Tour as a reason to design and make my first chair. Chairs are furniture that is the demands the most from craftsmen. First, it has to be strong enough to withstand all the weight and wracking force of the sitter. Then, it has to comfortable enough for the sitter to sit in for a long time. Then, it has to serve the function of that specific chair. A dining chair should be light and upright so it’s easy to move around and eat from. A lounge chair should be a little lower with more angle so it invites relaxation, but it shouldn’t be hard to get out of. And then finally, it has to look great. Not just from the front and sides, but from all angles.

    [singlepic id=189 w= h= float=center]

    For this chair, I went for unorthodox or different joinery methods so I can experiment and play around. Why make anything speculatively if you don’t push the limits, right? My design focus was for the seat and back to be one unit, and that these curved boomerang shapes will be the focus of the form. I brought the front legs from the sides and attaches to the side with an angled half lap joint with pegs to make it extra sturdy. I also brought the back legs in from the side and created the joinery so that the back legs are visually and physically holding the seat up. The angle of the legs makes the chair joint harder to break but it also keeps the sitter from being able to tilt the whole chair back on just the back legs. The back legs are mortise and tenoned in to the seat with dowels for extra grabbing power.

    [singlepic id=186 w= h= float=center]

    For the seat and back rest supports, I decided to laminate oak into curved slats that mimic the chair sides. The lamination makes it so I can get away with thinner material and makes the chair look nice with or without the upholstery. But just in case one of them does fail, I installed the slats using a dowel that has been hammered to create a mushroom like metal rivets. The wood rivets makes for a nice visual as well as tactile experience. I think the slats also make the piece look Nakashima-esque, but I may just be flattering myself.

    [singlepic id=185 w= h= float=center]

    You can’t have a lounge chair without cushions, so I commissioned my quilting and sewing friend Shannon Harris, to design and create the cushions to that would go well with the chairs. She came up with a simple and modern upholstery design using hexagons that compliments the lounge chairs well. I think the unique design fits in with the unique design of the chair perfectly. There is also a feeling of masculine and feminine to the chairs and upholstery by the wood and colors chosen. Also, for the show I asked Shannon to design a quilt that we could drape over the back of the chairs to create another layer. I also think it brings a feeling of warmth and that the furniture is ‘lived in’. The quilt is beautiful! the hexagon pattern flows from one corner to the other with changing tones. It speaks to the modern aesthetic while bringing warmth- which a lot of modern designs are lacking in.

    [singlepic id=215 w= h= float=center]

  • Yuta Standing Desk

    Yuta Standing Desk

    a3d88286a8c411e38fd8126050b2ecd3_8

    My brother, Yuta, commissioned a standing desk from me for his office. He’s been wanting one for awhile and had an Ikea one for his home office. He complained that it wasn’t sturdy and would wobble every time he touched it. I had also created a standing desk speculatively earlier, so I had him check it out so we can nail the dimensions down. The thing with standing desks is that there is not a standard size like most other furniture because we’re all different heights with different arm lengths and etc, etc.

    [singlepic id=164 w=320 h=240 float=center]

    Since he works for a media production company, he had to have plenty of space to sprawl out papers or editing equipment as well as his big computer monitor. I set about creating different levels of surfaces- one for his monitor, shallow and higher up so the eyes are level with the monitor. I created another level under the main surface so he can quickly clean the worktop and added drawers for extra storage. There is also a shelf towards the bottom where he can rest his feet on, store more things, and also to act as a stabilizing rail.

    [singlepic id=166 w=320 h=240 float=center]

    The difficult part of designing this piece was balancing out the size and bulk of the piece. The top came out to be 30″ wide x 58″ long. I started by cutting away angles- a large one in the front and a subtle one in the back. The desk had to match the rest of the room’s existing furniture (another desk I made for his birthday earlier) so we decided on pine plywood with the edges exposed. I kept going back and forth on this with myself, but I’m glad I stuck with it because the tone, color, and the grain is elegant. I’m especially happy with it because it uses an affordable material and shines it up with the use of thoughtful design and good craftsmanship.

    [singlepic id=167 w=320 h=240 float=center]

    To keep the light color, I used water-based polycrylic. The drawers are made from ash with the drawer front made from sinker cypress. I used UHMW plastic to act as drawer runners so the drawers won’t run a groove into the desk from use over time.

    [singlepic id=168 w=320 h=240 float=center]

  • FWC-18′ conference table

    FWC-18′ conference table

    fwc18-9

    The good people of Far West Capital are so awesome that their business and staff just keeps getting bigger and bigger. I had made a 12′ conference table for them a few years ago, and they’ve already outgrown that one, so they commissioned me to make a 18′ conference table this time. They loved the traditional meets modern aesthetic of the last one, so we decided to design something that looks totally different from the last one, yet feels similar.

    [singlepic id=162 w=320 h=240 float=center]

    This was by far the biggest project I’ve had the opportunity to work on and logistics became the first and foremost in the design aspect. How can I make these parts in my shop and how can I break the pieces up so I can move it safely and easily? I decided that the top will be made from 3 parts and I wanted to make the top as light as possible since that has the biggest area. To support the top, there are thick and wide aprons that come apart and fit together with notches made in the wood. This gives stability to an otherwise flexible top. The aprons rest on pedestals that are angles and tapered in almost every direction. The taper came from trying to gain as much foot space as possible without sacrificing stability. One side of the pedestal is held in with clips so you can remove it to store and hide conference table equipment. At the feet there is a 1/4″ blackened plate steel that adds weight and distributes the footprint out so the top wont tip over.

    [singlepic id=145 w=320 h=240 float=center]

    The whole table is made from peruvian walnut veneered panels with solid wood edging. The removable center piece is made of spalted beech. Spalted is a figure in wood caused by fungal attack. The wood is left for fungus to attack, but then harvested before the wood rots completely and becomes unusable. It’s characteristics are black vein like lines with wood tones around it being different. I think the spalted beech was a nice compliment to the peruvian walnut and adds a little bit of country to the otherwise sophisticated elements.

    [singlepic id=147 w=320 h=240 float=center]

    To break up the large dark surface and to give a nod to traditional furniture we chose to inlay cross banding around the border. Cross banding is inlayed wood that is aligned so the grain is oriented side to side across the length. The outer cross banding is made from Bolivian rosewood and the inner cross banding that borders the spalted beech is Macassar Ebony. I feel the different tones in the woods give a nice transition to the different woods.

    [singlepic id=144 w=320 h=240 float=center]

    Sixteen people can sit all around the table easily and maybe a few more if people are willing to get close and cozy with each other. I think this design is a success because the real design elements are in the small details.