Category: Bespoke

bespoke furniture

  • Christmas Jewelry Box

    Christmas Jewelry Box

    jbox5

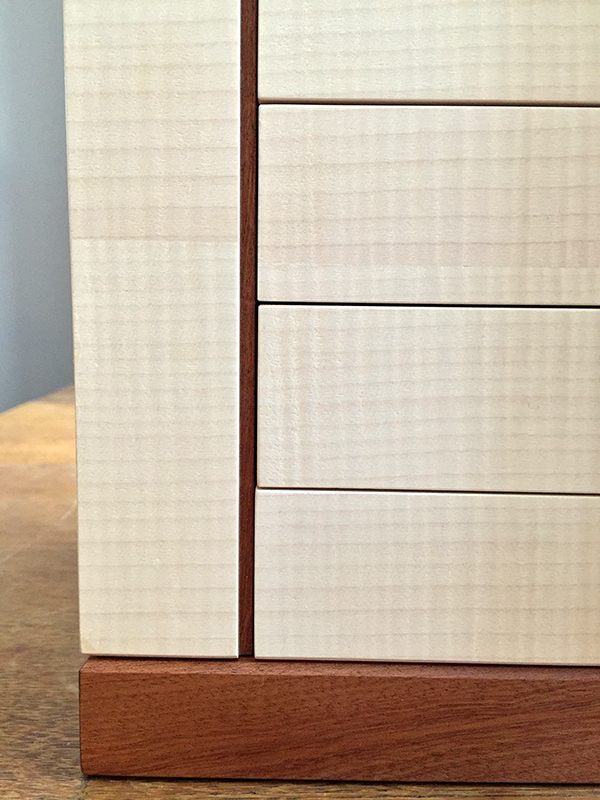
    A good friend of mine approached me to make a jewelry box for his wife as a Christmas present. Before this commission, she was using a large plastic fishing tackle box to house her jewelry box. It was time for her to get a legitimate box she could call a jewelry box.  She loves jewelry and has a lot of it so that was the main focus- creating an elegant box large enough to house her jewelry, but doesn’t look clunky. I went for rippled English sycamore because a light wood make the whole thing feel lighter and I believe a jewelry box looks better in light wood. The rippled English sycamore gives enough figure and patterns to make the box beautiful without being too dramatic.

    [singlepic id=211 w= h= float=center]

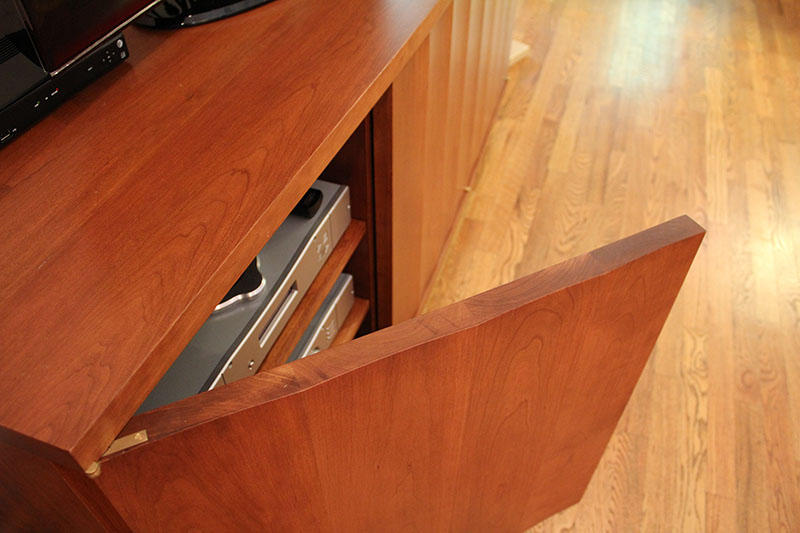
    The necklaces take up the most space, so we went for as much necklace storage as possible. There are two doors on the sides that hinge open to hold necklaces. On the door there are hooks and a small shelf so that hanging necklaces don’t keep the door from closing. There is also a lift up top made of Sapele that opens to reveal a compartment for earrings, rings, and small jewelry. When the lift up top is closed, it locks the side necklace doors so it’s easier to move around if need be.

    [singlepic id=208 w= h= float=center]

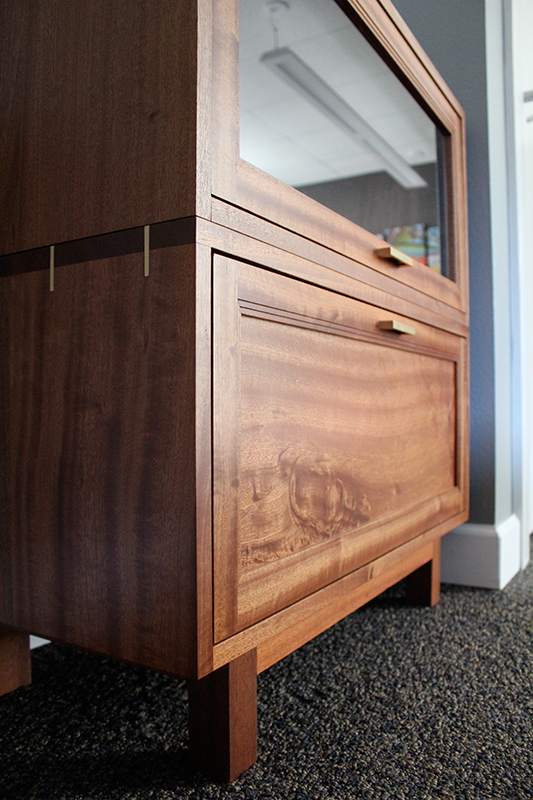
    There are 9 drawers- 3 long one and 6 mini ones, all with dividers in them. The drawers are made out of solid hard maple with splines in the corners to make it strong, as well as add a touch of decorative element. The dividers fit into the drawers using a birds mouth joinery, which make it possible to add dividers to thin wood without having to compromise the strength of the wood. I put in a green suede liner on the bottom to keep the jewelry from getting scratched up.

    [singlepic id=209 w= h= float=center]

    The style of this jewely box is definately modern/contemporary, but I hope the added details injects some warmth to the design. I believe it will only get better with age and become more joy to use the longer she uses it. The rippled sycamore is finished using Renaissance wax, a wax developed by British art conservationist.

    [singlepic id=210 w= h= float=center]

  • Caswell 136 Shelf

    Caswell 136 Shelf

    shelf-136-1

    My Client approached me to solve a problem they’ve been having for years. They have a large collection of art pieces they’ve collected on their travels but nowhere to show it off. The living room would be an ideal place for the shelf but there wasn’t a place that looked natural. They also didn’t want anything standard or ‘off the shelf’. The shelves should be something sculptural and visually pleasing by itself and would compliment the pieces shown.

    [singlepic id=193 w= h= float=center]

    The first problem we had to face was where to put the shelves. After some back and forth and several version and full scale models of the initial design, we came up with the perfect place for it. The only thing was that it was in a corner that made a 136 degree angle. To add to the difficulty of working with those angles, I designed the shelves into curved shelves, and to add to even that, the shelves are all different sizes, getting smaller the higher up the shelves went. Oh, and did I mention that the center support pole is angled?

    [singlepic id=195 w= h= float=center]

    Our concept of the design started as curved shelves with a single pole that supports the shelves. To me, the design has a feel of a Japanese paper umbrella mixed with Japanese folding fans. There is an open space behind the shelves where the pole connects to the shelf which lighten up the structure and make it where it doesn’t look like a ‘built in’ furniture, but more like a free standing furniture that’s just leaning against the wall.

    [singlepic id=194 w= h= float=center]

    of course, everything is anchored to the wall and floor so it’s super sturdy. The pole has limbs that come out that help support the bulk of the weight on the shelves. The limbs are joined to the center support pole using double mortise and tenon so there’s no worry about the shelves containing the priceless art work (and the memories attached to them) to ever come off and break. To keep the pieces from potentially sliding off, I also included a tiny lip around the perimeter of the shelf so it contains everything in.

    [singlepic id=192 w= h= float=center]

    The whole thing is made out of cherry with stain and finish to match the credenza I made for this client earlier this year.

  • A Colorist’s Desk

    A Colorist’s Desk

    malina-desk9

    A colorist for film approached me to create a desk for him. A colorist is the person who adjust the color in a film frame by frame to make sure that everything is consistent and there are no sudden changes. Because of the way that light affects how your eye sees colors, he works in a pitch black room with a single light source that has the correct light frequencies. He also has clients come to his studio so he can show them what he’s working on so the desk also had to look presentable to clients from every direction. Another design requirement was that the desk had to support all of his big monitors and his editing gear.

    [singlepic id=203 w= h= float=center]

    We came up with using walnut because it’s a dark tone wood and the tone blends into the darkness when all the lights are off. The top also had to be large enough to hold all his editing equipment without it taking up the entire room. Since there are clients in there frequently while he’s editing, we included a modesty panel to keep the area looking clean. The attention needs to be on the big screen, not the mess under the desk. To make the desk not feel like a huge heavy mass, I included cutouts in the modesty panel where it meets the frame.

    [singlepic id=200 w= h= float=center]

    The desk form is simple, and we wanted it to look nice, but not be the source of attention. To add a touch of sophistication and craftsmanship, the details are what shine through from the inlaid metal drawer pull to the stainless steel steel holding the desk top to the frame. The cutouts for wire management also adds appeal to the whole desk where everything is thought out ahead of time, rather just some hole with an off the shelf grommet.

    [singlepic id=201 w= h= float=center]

    Editing a film takes a lot of computer power and storage power, so we needed a place to store all his other equipment as well. We went with an open from cabinet for maximum air circulation that showcased his equipment rather than hiding it. The side cabinet mimics the desk design so it looks like a set.

    [singlepic id=202 w= h= float=center]

  • Barrister inspired File Cabinet

    Barrister inspired File Cabinet

    filecabe4

    My client wanted a file cabinet to go with the round meeting table I had made for his office. Not needing to store many files, I wanted a piece of furniture that has many functions. Along with being a file cabinet, I wanted a to create a little shelf to place books, artwork, or other things in. Taking a cue from a barrister’s bookcase, I decided to make two separate cabinets that is stacked on top to create a bigger cabinet. This idea solidifies the different function these two cabinets have but combines it in one unified piece. I also made the total height end up so that it becomes a little table surface to put keys, snacks, business cards, or cups on.

    [singlepic id=182 w= h= float=none]

    First, I created a wide drawer for all the hanging files and oriented them in a lateral orientation to maximize the amount of storage without the cabinet becoming too deep. I didn’t want just a regular plain old box so I decided to have the top poke through so you see the end grain from the side. I also put in brass splines to accent that joint, but also give a little jazz to an otherwise boring joinery.

    [singlepic id=180 w= h= float=left]

    The upped cabinet is created in a similar fashion but the door is a glass door with mahogany frame. The idea for doors in a barrister’s bookcase is that the glass protects the contents from dust, without blocking the view of the contents. I wanted the door to swing up and slide back so no one has to hold the door open to access the contents. The mechanism took some figuring out to do since the door wants to rack and pinch as it’s sliding back. I alleviated some of that tendency by creating a brass guide that runs in a slot created in the back side of the door. The track helps keep the doors aligned parallel.

    [singlepic id=183 w= h= float=left]

    The whole piece is created using solid Sipo Mahogany. The drawers are made from Hard Maple with a box joint joinery.

  • Sapele Round Table

    Sapele Round Table

    harmonsonround1

    This table was commissioned to be a meeting table for guests and clients at my client’s office. I had previously created other furniture for his office in a style that mixes traditional details and arranged in a modern way – Harmonson Desk & Harmonson Credenza. I wanted to keep those same ideas with this round table, so I worked on blending the traditional elements with modern elements without one being over bearing.

    [singlepic id=179 w=320 h=240 float=center]

    The top is a beautiful 1/16″ thick ribbon striped sapele veneered top. The perimeter of the top is made out of solid wood not only for looks, but for protection. I arranged the sapele veneers in quarter section so that each quarter lines up to meet in the center. This pattern creates a V- pattern where each sections meet. Since I was able to get a nice consistent line, I didn’t want to hide it so I decided that instead of doing a single inlayed line, I would do a double line and have the V-pattern become another focal point. Having that double line also meant that the lines need to terminate to the perimeter in a thoughtful and graceful way so I decided on another double line that follows the curve of the top.

    [singlepic id=177 w=320 h=240 float=center]

    To keep the modern element, I decided on a tapered square pedestal base. The sapele is used again for the panels, which sticks out 3/16″ to create a three dimensional element. The framework is blackened hard maple. A lot of the design elements of this round table is actually based on a square- the tapered pedestal base and the top being broken into quarters- so I wanted to follow that theme and create a square centerpiece with a decorative wood (pepperwood burl). I think the square ties the top and the base together.

    [singlepic id=178 w=320 h=240 float=center]

    The square is oriented so it looks like a diamond with the double maple inlay stringing terminating at each of the corners. I’m very happy with the combination of sapele and pepperwood burl together. The tones compliment each other and the straight lines of sapele counter-act the free form wazy grain of the pepperwood burl.

    [singlepic id=176 w=320 h=240 float=center]

  • Caswell Media Cabinet

    Caswell Media Cabinet

    caswell-media-1

    My clients approached me at a studio tour after seeing some of my works on display. They have been looking for a designer to come up with a solution to their music equipment storage needs. The husband is a music lover with music being a huge part of his life. His wife wanted something that covers up all of his equipment in an elegant and charming way. They came to me after being disappointed with other designers who couldn’t think outside the box- literally. One of the first things they told me was that it should have some curves and it should fit in with the rest of their house with all the art they have collected from years of going on trips.

    [singlepic id=171 w=320 h=240 float=center]

    The cabinet bows out in the middle creating a soft curve in the front. The solid wood doors follow that curve and have a slight concave surface. The concave curve is subtle enough that it’s not immediately obvious what’s going on. It’s only after you walk around and see the light wrapping and bouncing off the surface that you notice something is going on. Upon closer investigation, you notice the curves outlined on the bottom of the cabinet like gentle waves.

    [singlepic id=172 w=320 h=240 float=center]

    It’s a subtle thing, but the boards in the center are slightly narrower and the boards wider towards the outside so that as the curve stretches back, the boards look similar in scale to the others. To get a nice crisp line where the random sized boards meet, but keep the same depth of curve on the surface of the doors, I created a hand plane with a radius on the blade and sole so I can fine tune everything so it’s just right. The idea of doing things by hand appeals to me since people can subconsciously pick up on small irregularities that machines (robots) can’t reproduce- creating a warmer and friendlier piece.

    [singlepic id=173 w=320 h=240 float=center]

    The doors are hung using offset knife hinges. These discreet hinges don’t break up the clean lines but offer the ability to swing the to almost 180 degrees (or 270 degrees on the sides). Since any knobs or pulls would also break up the clean lines, we opted to go for the magnetic push latch handles. Just press on the door and pop, the door opens enough to get your hand behind the door.

    [singlepic id=170 w=320 h=240 float=center]

    The shelves are all adjustable and also follow the same convex curve as the cabinet front so everything is integral inside and out. The feet also has a gentle tapering curve to create unity but most importantly, the feet give the whole piece a human or animalistic feel. (not square and sharp like many modern furntiures out there).

    [singlepic id=169 w=320 h=240 float=center]

    I had my go-to finisher, Ken Boone, do some color matching to darken the cherry up a little bit, and then topped off with a lacquer finish. I delivered the media cabinet to a very happy client. – “Every time I walk in this room, I just take a long look at it and smile”